Rye Berry Tek: Grain Spawn Deep Dive
Everything you need to know about Rye Berry Tek: Grain Spawn Deep Dive — from materials to first harvest.
What You'll Need
- See full supply list in guide below.
Find grow supplies at vendors in our Directory.
Step-by-Step Process
Rye Berry Tek: Grain Spawn Deep Dive
Rye berries are widely considered the best grain substrate for mushroom cultivation — preferred by professional cultivators, laboratory facilities, and anyone who has worked with multiple grain types and settled on one. This guide covers rye berry tek from procurement through to colonized spawn ready for bulk substrate or fruiting.
Why Rye
Nutritional profile: Rye is exceptionally dense in carbohydrates, proteins, and minerals relative to other grains. This nutritional richness translates to vigorous mycelium growth, fast colonization, and healthy inoculum for bulk substrate.
Density: Rye berries produce a dense, tightly colonized grain mass that transfers extremely well to bulk substrate. The dense network means more mycelium per gram of spawn.
Shelf stability: Colonized rye grain stores in a refrigerator for longer than some other grains — useful if you want to have colonized spawn ready without fruiting immediately.
Grain-to-grain transfer: Rye is the preferred substrate for grain-to-grain (G2G) transfers — using colonized rye to inoculate fresh sterilized rye without a liquid culture or spore syringe. This allows rapid scaling without additional spore syringes.
Sourcing Rye Berries
Rye berries are found at:
- Health food stores (Bob's Red Mill brand is common; bulk bins at Whole Foods, Sprouts)
- Online (Amazon — large bags of whole rye grain are very affordable)
- Homebrew suppliers (sometimes available as a malt ingredient)
- International grocery stores
What to look for: Whole rye grain, not rye flour. Organic is fine but not necessary. Rye that has not been cracked or rolled.
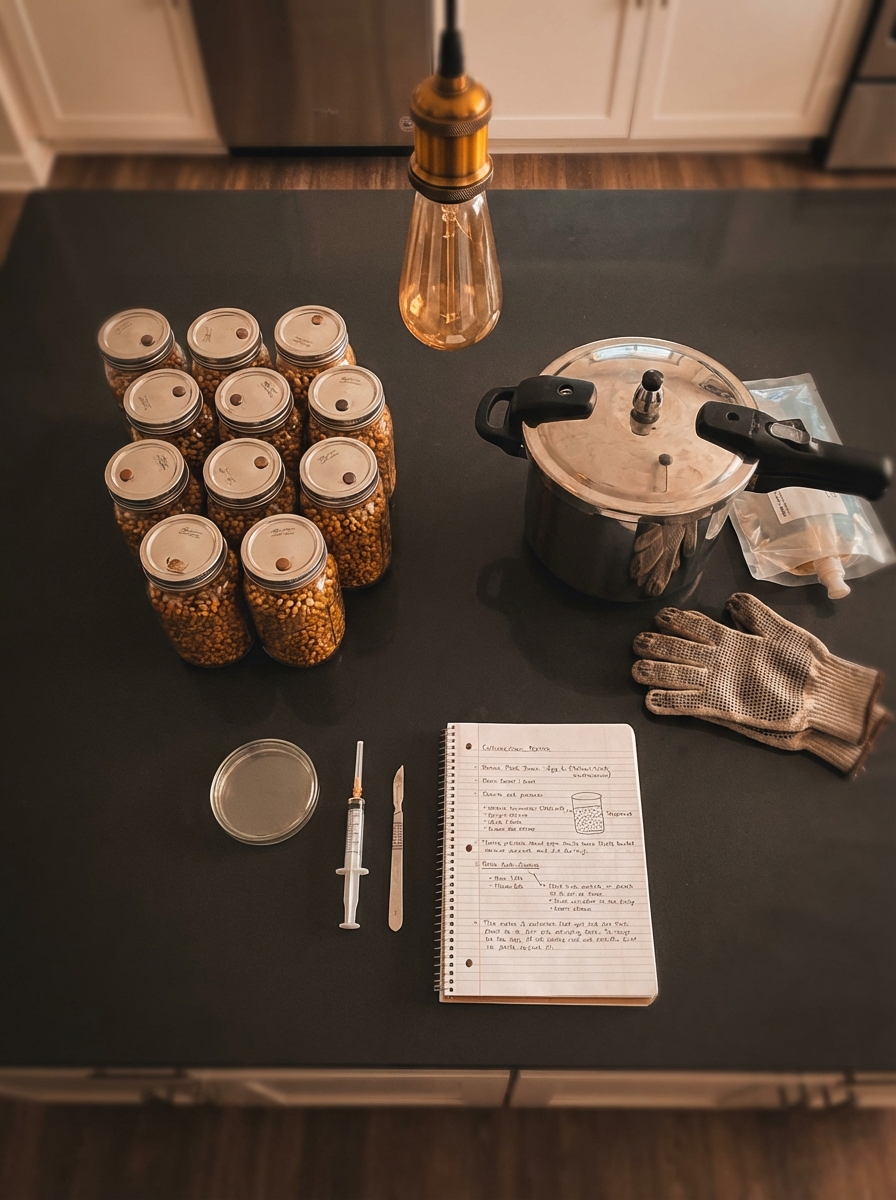
Equipment
- Rye berries (2–5 lbs makes many jars)
- Large pot for soaking and simmering
- Colander or strainer
- Clean towels or paper for drying
- Wide-mouth quart mason jars (recommended over half-pints for rye — quart jars make harvesting easier)
- Pressure cooker (16-quart or larger recommended)
- Foil
- Optional: Injection port lids (highly recommended)
Step 1: Rinse
Rinse rye berries thoroughly under cold water. Unlike WBS with its chaff, rye is relatively clean, but rinsing removes surface dust and any broken grain fragments that could contribute to contamination.
2–3 rinse cycles until water runs clear.
Step 2: Soak
Cover rinsed rye with several inches of water. Soak 12–24 hours.
Longer soaks vs. shorter: 12 hours is minimum. 24 hours produces more evenly hydrated grain. Some cultivators add a small amount of gypsum (calcium sulfate) to the soak water — approximately 1 teaspoon per gallon — as a pH buffer and to reduce bacterial contamination risk.
The grain will absorb water and swell noticeably over the soak period.
Step 3: Simmer
Drain soaked rye. Transfer to a pot and cover with fresh water. Bring to a simmer over medium heat. Simmer for 15–20 minutes.
Target consistency: Grain should be tender when pressed between two fingers but not mushy. Biting a grain (once cooled enough) should reveal no hard, dry center.
Watch for: Rye that is overcooked will have split skins and very soft texture. This is problematic — burst rye creates excess moisture in jars. If in doubt, simmer less rather than more; you can always resimmer, but you can't un-cook.
Step 4: Drain and Dry — The Most Critical Step
This is where rye differs most from WBS and where growers most often go wrong.
Drain simmered rye thoroughly in a colander. Spread on clean towels or paper towel layers on a baking sheet. Stir occasionally.
Drying goal: Surface-dry grain with moist interior. You want to steam off surface moisture without dehydrating the grain interior.
Timing: Typically 30–60 minutes at room temperature. In a slightly warm oven (170°F / 75°C) with the door cracked: 10–15 minutes.
Field capacity test: Press a handful of rye firmly in your palm. When you open your hand, the grain should hold very briefly then fall apart. Squeeze hard — if water beads on the surface of your hand, it's too wet. If the grain feels hard and unyielding, it's too dry.
The wet rye problem: Wet rye jars produce Bacillus (bacterial wet rot) because the soggy conditions favor anaerobic bacteria. This is the #1 failure point for rye tek. When in doubt, dry longer.
Step 5: Fill and Sterilize
Fill quart mason jars approximately 2/3 full with dried rye. The grain will shift and pack, so fill slightly higher than your final desired level.
Jar tops: Apply injection port lids (recommended) or standard lids loosened a quarter turn. Cover with foil.
Pressure cook: 15 PSI for 90 minutes (quart jars). 2 hours if unsure about grain moisture. Allow to fully cool (12–24 hours) before inoculating.
Step 6: Inoculate
In a still air box or flow hood:
- Flame needle until red hot, cool 3–5 seconds
- Wipe injection port with 70% IPA
- Inject 1–2ml per quart jar against the glass wall
- Multiple injection points distribute spores evenly
After inoculation, give the jar a firm shake to distribute spore solution across the grain surface.
Colonization Timeline
At 75–80°F:
- Days 3–7: White mycelium spots appear at inoculation points
- Days 7–14: Colonization expanding through jar
- Days 14–21: Full colonization typical for clean, vigorous cultures
At day 7–10 (approximately 30% colonization), give the jar a firm shake. Breaking up the colonized mass distributes mycelium throughout uncolonized grain and typically reduces time to full colonization by 3–7 days.
Do not shake after 70%+ colonization — at this point, mycelium consolidation is happening and disruption may slow fruiting initiation in jar-direct methods.
Grain-to-Grain (G2G) Transfer
One major advantage of rye is efficient G2G transfer. Rather than using a spore syringe for every batch, you can use a small amount of colonized rye to inoculate fresh sterilized rye:
- In a still air box, open a colonized rye jar
- Transfer 1–2 tablespoons of colonized rye into a fresh sterilized jar
- Shake to distribute
- Seal and incubate
G2G is faster than syringe inoculation (mycelium-to-grain contact is more direct than spore germination) and multiplies your inoculum volume rapidly. One inoculated quart jar can G2G-inoculate 4–6 additional jars.
Moving to Bulk Substrate
Colonized rye is ready for use as spawn when the jar is fully white, smells clean and mushroomy, and the grain masses hold together but break apart easily.
Spawn rate: Use colonized rye at 15–25% of total bulk substrate volume by weight. For a 4-lb bulk substrate block, use 0.6–1 lb of colonized rye.
Rye's density and mycelium quality typically produces faster bulk colonization than less nutritious spawn sources.
Common Problems & Troubleshooting
See the Contamination Guide for common issues.
Tips for Success
Take notes at every stage. Consistency beats perfection.