Casing Layers: Purpose, Materials, and Techniques
Everything you need to know about Casing Layers: Purpose, Materials, and Techniques — from materials to first harvest.
What You'll Need
- See full supply list in guide below.
Find grow supplies at vendors in our Directory.
Step-by-Step Process
Casing Layers: Purpose, Materials, and Techniques

A casing layer is a top dressing applied to fully colonized substrate before placing a tub into fruiting conditions. Not every grow requires one, but understanding what a casing does — and what materials best accomplish it — will help you decide when to use one and how to apply it correctly. For species that pin reliably without casing, it can be skipped. For species that need encouragement, or grows where you want consistent, dense pins across the entire surface, casing is often the difference between one flush and four.
Casing Decision Filter
Do this before adding another step to a grow:
- Species need: Many gourmet species do not use a traditional top casing. Confirm the species and method before copying a monotub habit.
- Legal boundary: Keep technique practice to edible or otherwise clearly permitted species in your jurisdiction.
- Even depth: Think thin, level, and breathable. Heavy casing can trap moisture and carbon dioxide.
- Skip when unsure: If the substrate is not fully colonized or looks suspect, do not cover the problem with casing.
What a Casing Layer Does
A casing layer serves three distinct functions simultaneously.
Moisture retention: Mycelium at the surface of a bulk substrate loses moisture quickly under fruiting conditions — air exchange and evaporation dry out the top layer before pins can form. A casing material buffers this, retaining moisture in the immediate zone where pins emerge while allowing surface evaporation to maintain proper humidity in the fruiting chamber.
Pin initiation surface: Many species require physical contact with a porous, non-nutritive layer to trigger pinning. The casing signals to the mycelium that it has reached the surface and that the fruiting phase should begin. Species like Psilocybe cubensis will initiate pins directly on bulk substrate in many conditions, but even then a casing layer often produces a more uniform, edge-to-edge pin set rather than sporadic pinning concentrated at air gaps.
Contamination buffer: A pasteurized, non-nutritive casing sits between the nutrient-rich bulk substrate and the open air of the fruiting chamber. Contaminant molds generally need nutrients to establish — on a low-nutrient casing like coco coir or peat, they find less to work with than on the substrate below, giving mycelium time to colonize the casing surface and outcompete potential invaders.
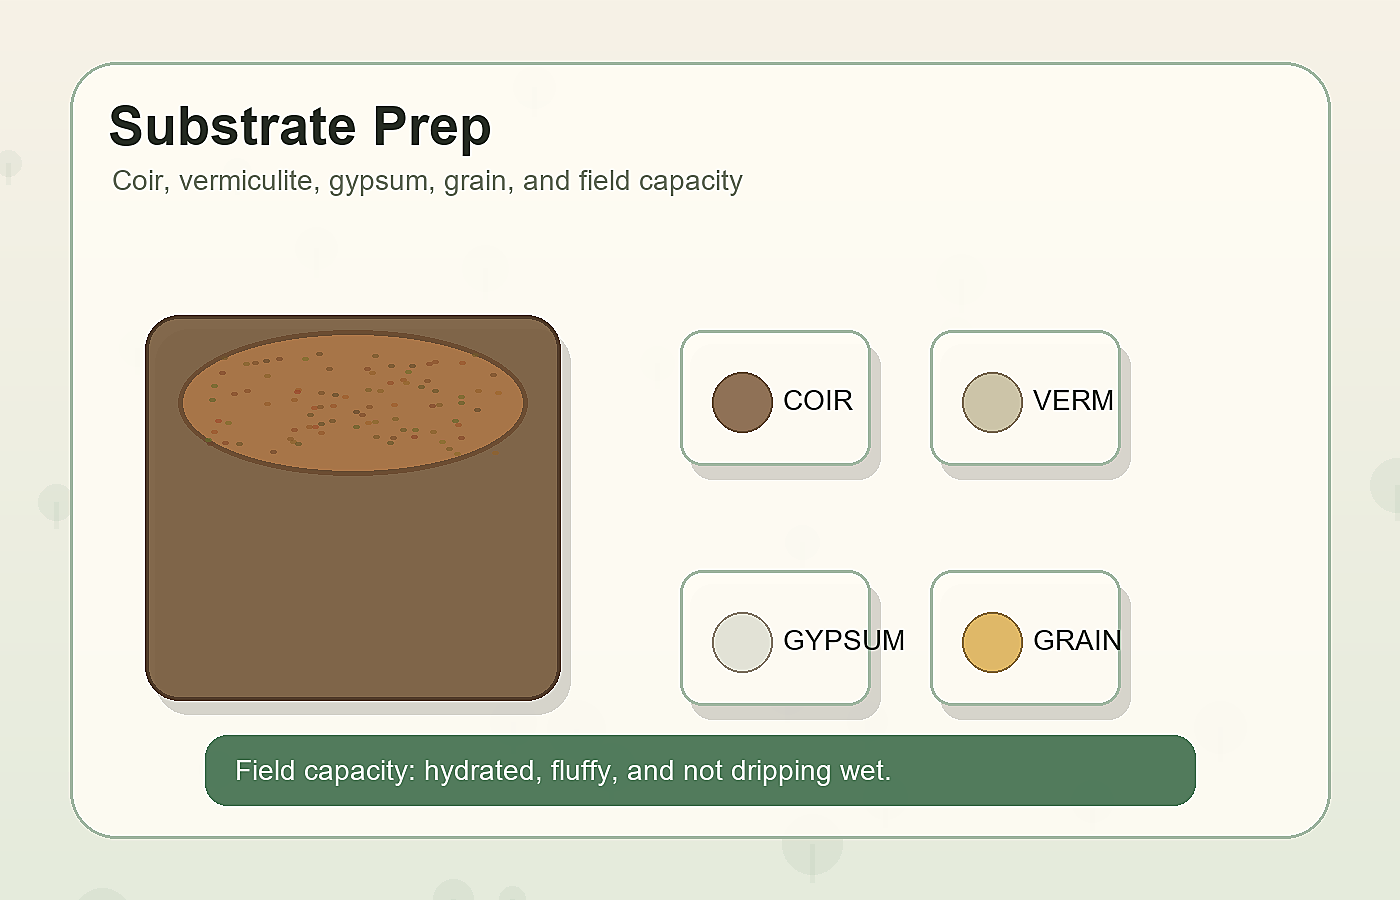
Common Casing Materials
Coco coir and vermiculite (CVG): The most popular casing for cubensis. Mix coco coir and fine vermiculite at roughly 50/50 by volume, hydrate to field capacity (water drips out only when squeezed firmly), and pasteurize at 160–180°F for 1–2 hours. Lightweight, affordable, and forgiving. Vermiculite creates air pockets that help with gas exchange and pin formation.
50/50+ Casing (peat moss and vermiculite): A classic formula used in commercial and hobby bisporus cultivation. Combines sphagnum peat moss, vermiculite, and sometimes a small amount of hydrated lime to adjust pH toward neutral (peat is naturally acidic, around pH 4–5; bisporus prefers pH 7–7.5). Peat holds moisture extremely well and produces consistent results for species that demand it.
Field soil or casing soil mixes: Some cultivators use sterilized topsoil or commercially available casing soils. These can introduce complexity (variable pH, unpredictable microbial content) that makes them less reliable than purpose-mixed materials. Best left to cultivators with casing experience who understand how to evaluate and adjust soil properties.
Straight coco coir: Works but tends to dry out faster than coir-vermiculite blends. Acceptable for short fruiting runs where you can mist consistently.
Hydrated lime adjusted mixes: For pH-sensitive species, small amounts (0.5–1%) of hydrated lime are added to raise pH. Most psilocybe species fruit well in the pH 6–7 range that coir/vermiculite naturally provides without amendment.
Preparing Casing Material to Field Capacity
Field capacity is the correct moisture level for casing material. The test: take a handful and squeeze firmly. A few drops of water should drip out — 3 to 5 drops. If water streams out, it is too wet and will suffocate surface mycelium. If nothing comes out and the material feels damp but not wet, add water gradually and retest.
Hydrate your casing mix in a clean bucket, mix thoroughly, then pasteurize in an oven at 160°F for 60–90 minutes or in a pressure cooker at low pressure for 15–20 minutes. Allow to cool to room temperature before applying.
Applying the Casing Layer
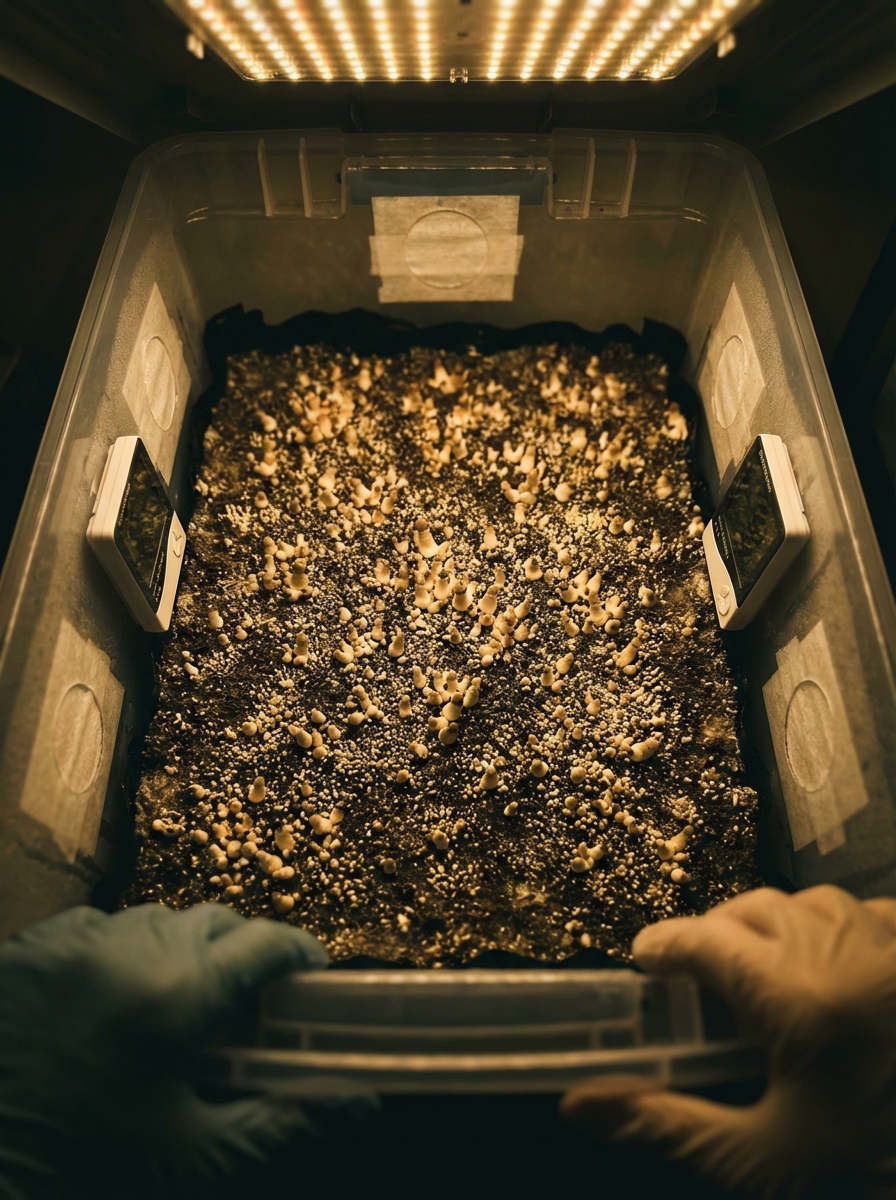
Apply casing after the bulk substrate is fully colonized — visible as a solid white mass throughout the tub, with full coverage of the substrate surface. Applying casing to partially colonized substrate invites contamination.
Depth: 0.5–1 cm is the standard. Thinner than 0.5 cm dries out too quickly. Thicker than 1 cm can cause issues with gas exchange — CO2 building up beneath the casing surface rather than dissipating. Some cultivators go as thin as 3–4mm for species that pin readily and just want surface moisture buffering.
Application method: Spread casing material evenly across the substrate surface using a spoon or gloved hand. Avoid pressing hard — you want a loose, porous layer, not compacted material. Level the surface so depth is consistent across the tub; uneven casing leads to uneven pins.
After applying, cover the tub and allow mycelium to colonize into the casing layer before initiating fruiting. This typically takes 3–7 days at colonization temperatures (75–78°F). You will see white mycelium threading into the casing from below. Once you see the first hint of surface mycelium at the casing top, initiate fruiting conditions.
Casing for Different Species
Psilocybe cubensis: Does not strictly require casing in a well-managed monotub or shotgun fruiting chamber, but benefits from it for yields and consistency. CVG casing works well.
Agaricus bisporus (button mushrooms): Casing is essential for fruiting. Bisporus mycelium will not pin without a casing layer in almost all cultivation scenarios. Peat-lime or commercial casing soils are standard.
Pleurotus species (oyster mushrooms): Casing is generally not used. Oysters pin at substrate edges exposed to air, not on a top surface.
Gourmet tropical species (Hericium, Grifola, etc.): Species-dependent. Most do not benefit from traditional casing approaches used for cubensis.
Hydration Management During Fruiting
Once casing is applied and fruiting begins, the casing layer is your primary hydration management point. Mist the casing surface lightly 1–2 times daily — enough to keep it visibly damp but never pooling. Mist the walls of the fruiting chamber (not directly onto pins) to maintain ambient humidity. Between misting cycles, allow a brief fresh air exchange period so CO2 levels drop and the casing surface can breathe.
If the casing surface begins to look dry or cracked, increase misting frequency. If you see water pooling in the tub, prop the lid slightly longer during fresh air exchange to increase evaporation.
When to Skip Casing
Casing adds time and materials. For species and methods where it adds little benefit, skipping it is a legitimate choice.
Skip casing when: growing oysters or other species that pin at exposed substrate faces; using the uncle ben's tek or PF tek where pins form inside jars or small containers; working in a high-humidity environment where the substrate surface naturally stays moist; or doing test grows where simplicity matters more than maximum yield.
Use casing when: working with bisporus or other casing-dependent species; attempting to maximize flush consistency and pin density in a monotub; adding a contamination buffer layer on a substrate that may have borderline issues; or when experience tells you a particular substrate and species combination flushes better with it.
Common Problems & Troubleshooting
See the Contamination Guide for common issues.
Tips for Success
Take notes at every stage. Consistency beats perfection.