Monotub Tek
Everything you need to know about Monotub Tek — from materials to first harvest.

What You'll Need
- See full supply list in guide below.
Find grow supplies at vendors in our Directory.
Step-by-Step Process
Monotub Tek: High-Yield Bulk Cultivation
Monotub Tek is the standard method for serious home cultivation of Psilocybe cubensis. Where PF Tek produces a few grams per jar, a properly run monotub routinely produces 1–3 oz (28–85g) dried per flush from a single tub — enough that one or two monotubs satisfy most personal use needs indefinitely.
The principle is simple: grain spawn colonized with mycelium is mixed into a bulk substrate (usually CVG — coco coir, vermiculite, and gypsum), and the combined mass colonizes and fruits inside a large sealed tote. The tub's volume and the bulk substrate's moisture retention create a self-humidifying environment that largely manages itself between flushes.
This guide assumes you have completed at least one or two successful PF Tek grows and are comfortable with sterile technique, recognizing healthy mycelium, and spotting contamination. If you haven't done PF Tek, start there.
Equipment and Supplies
The Tub
A 112-quart clear plastic storage tote is the standard monotub size for home cultivation. Brands like Sterilite and Iris work well. Clear sides let you monitor colonization progress without opening the tub.
Tub sizing: The 112qt tub produces the best balance of yield and manageability for most home growers. 56qt tubs work for smaller batches; larger tubs produce more but are harder to handle and require more substrate volume.
Lid modification: Drill two rows of 1/2" holes along the long sides of the tub near the top, and optionally in the lid. Fill each hole with polyfill or synthetic pillow stuffing — this is your gas exchange system. The polyfill allows CO₂ out and fresh air in while preventing large airborne contaminants from entering.
Substrate (CVG)
CVG — Coco Coir, Vermiculite, and Gypsum — is the most popular bulk substrate for monotub cultivation. It is pasteurizable (not requiring pressure cooking), widely available, and produces reliable results with most cubensis strains.
CVG recipe for one 112qt tub:
| Ingredient | Amount | |-----------|--------| | Coco coir (compressed brick) | 650g dry weight (one standard brick) | | Fine vermiculite | 2 liters | | Gypsum (food-grade) | 1 cup (optional but recommended) | | Boiling water | ~4–5 liters |
Gypsum improves substrate structure and provides calcium and sulfur that support fruiting. It is not essential but is cheap and improves results.
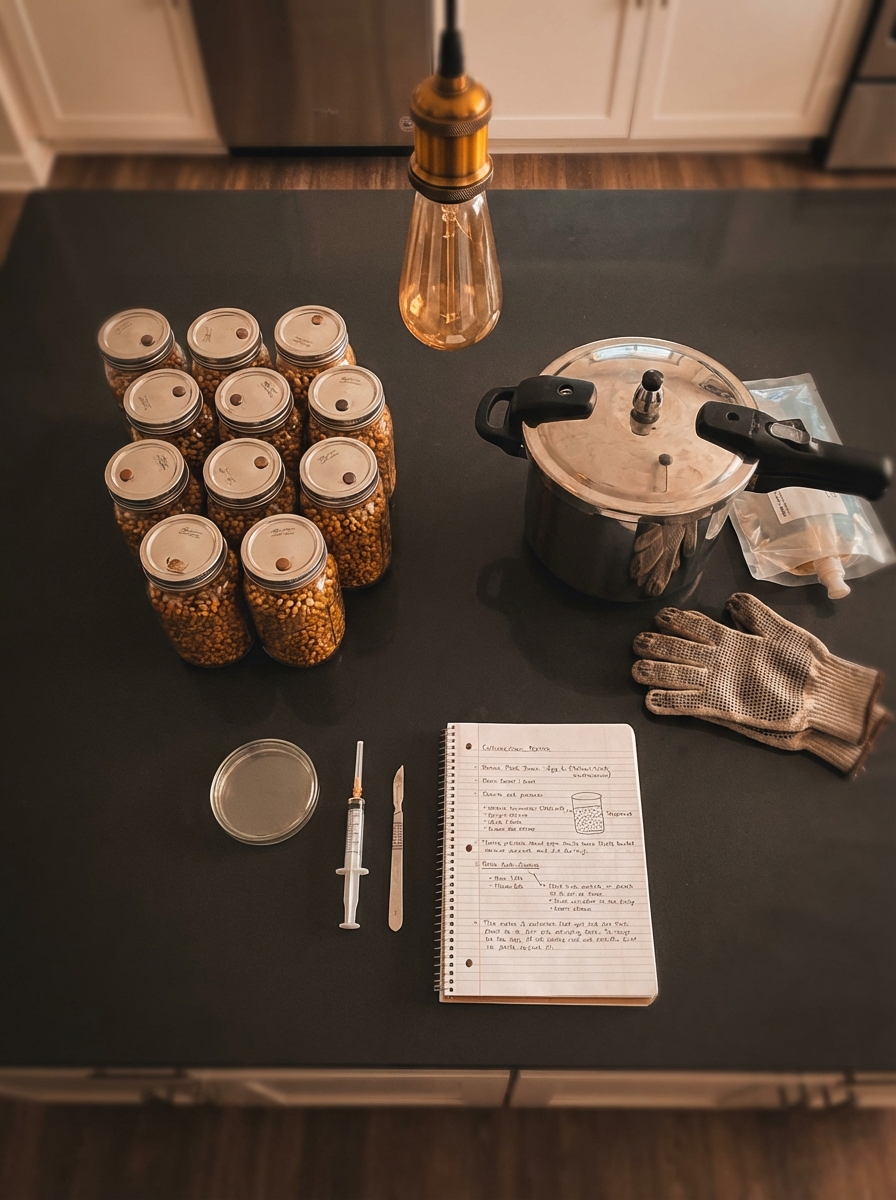
Grain Spawn
Grain spawn is colonized grain — rye berries, oat groats, or wheat berries that have been sterilized and inoculated with spore solution, then fully colonized by mycelium. It is the inoculant you mix into CVG.
Grain spawn quantity per 112qt tub: 2–3 quart jars (or equivalent bag) of fully colonized grain. More spawn means faster colonization of the bulk substrate and lower contamination risk; less spawn works but colonization is slower.
You can produce grain spawn from PF Tek inoculation (inoculate grain jars with your spore syringe the same way you would BRF jars) or purchase ready-made spawn from vendors in states where cultivation is legal.
Step 1: Prepare CVG Substrate
Hydrate and Pasteurize
- Break up the coco coir brick into a large bucket or pot.
- Boil 4–5 liters of water and pour over the coir. The boiling water both hydrates and pasteurizes the substrate.
- Add vermiculite and gypsum to the hot coir. Mix thoroughly.
- Cover the bucket with a lid or plastic wrap and allow to cool to room temperature — minimum 8 hours. The covered cooling period continues pasteurization (holding heat kills most competing organisms) and reduces contamination risk during the cool-down phase.
Test Field Capacity
Before mixing with spawn, the CVG moisture level must be correct — field capacity. Too wet and the substrate becomes anaerobic and contamination-prone; too dry and mycelium will stall.
Field capacity test: Squeeze a handful of substrate firmly in your fist.
- A few drops of water dripping out: correct field capacity.
- Water streams out freely: too wet — mix in additional dry vermiculite.
- No water and substrate crumbles: too dry — add small amounts of water and retest.
Step 2: Mix Spawn and Substrate
This step must be done with clean hands or gloves in a reasonably clean environment. You don't need a still air box for grain-to-bulk transfer, but you should avoid dusty environments and work efficiently.
The Mix
- Pour your fully colonized grain spawn into the prepared CVG in a large bucket or directly in the tub.
- Mix thoroughly — break up grain clusters and distribute mycelium evenly throughout the CVG.
- The combined spawn + CVG should feel slightly cooler than body temperature and hold its shape when squeezed.
Ratio
A common spawn-to-substrate ratio for monotubs is 1:3 to 1:4 by volume (1 part grain spawn to 3–4 parts CVG). Higher spawn ratios (1:2) colonize faster but use more expensive grain spawn; lower ratios (1:5) are possible with very vigorous strains but increase contamination risk.
Load the Tub
- Transfer the mixed spawn + CVG into your prepared monotub.
- Target a substrate depth of 4–6 inches. Too shallow limits total yield; too deep can create anaerobic zones at the base.
- Pack lightly and level the surface — a flat, even surface produces more uniform pinning than uneven or humped substrate.
- Do not case (add a casing layer) for standard monotub runs — casing adds complexity without proportional benefit for most cubensis strains. CVG-only substrate performs well without casing for cubensis.
Step 3: Colonization
Seal and Wait
Seal the tub with the lid. The polyfill holes provide passive gas exchange — no fanning required during colonization. Place the tub in a warm location.
- Temperature: 75–81°F (24–27°C)
- Darkness: Not mandatory, but mycelium colonizes well without light; indirect light is fine
- Do not open the tub during colonization — every opening is a contamination opportunity
What to Watch For
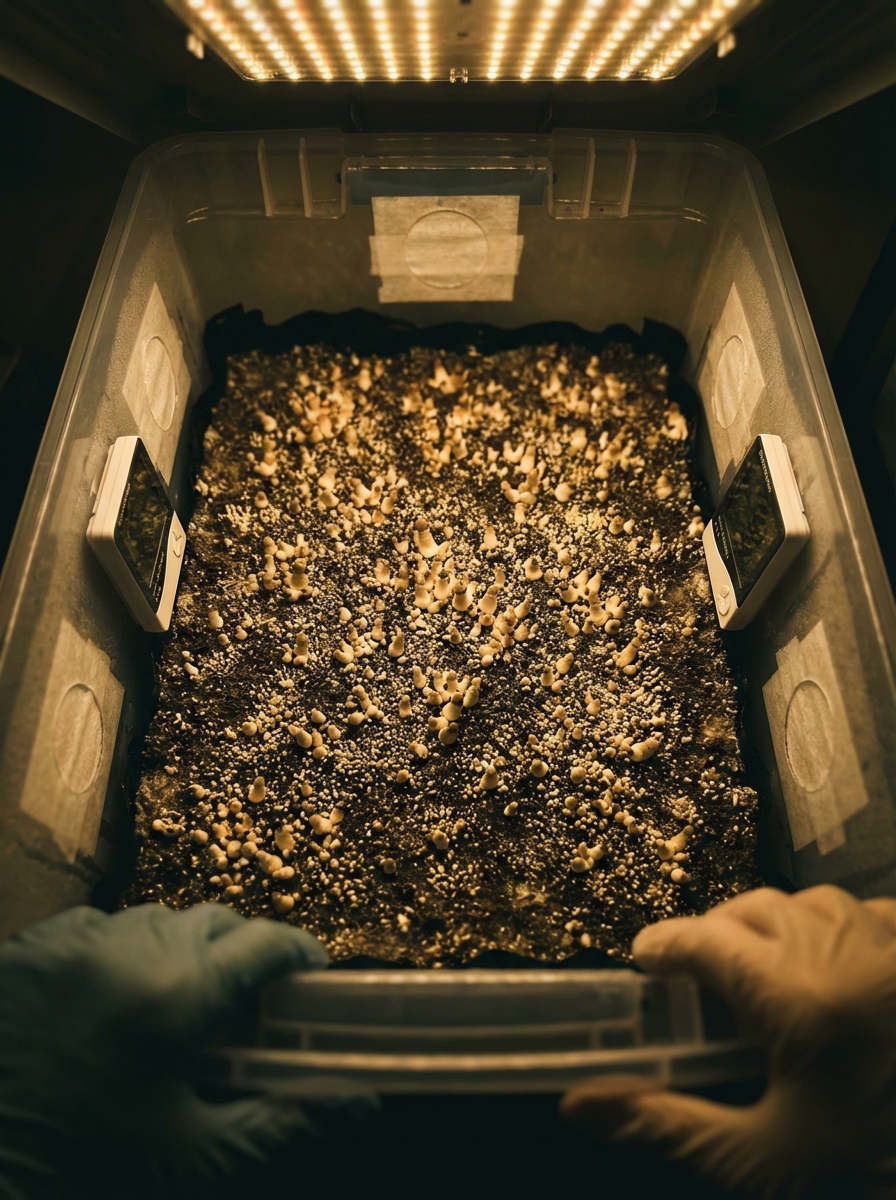
Through the clear sides of the tub, monitor colonization progress:
- Days 3–7: White mycelium visible along grain contact points and spreading outward into CVG
- Days 7–14: White sectors growing and merging; substrate increasingly white
- Days 14–21: Full colonization visible on sides and top
Colonization time varies by strain, temperature, and spawn ratio. Faster strains (Z-Strain, B+) in warm conditions with generous spawn ratios may colonize in 10–14 days. Slower strains (PE, McKennaii) may take 18–25 days.
Green Mold
If you see green mold (Trichoderma) appearing anywhere in the tub during colonization, your options are limited:
- Small spot, caught early: Some growers salt the spot with table salt, which kills the mold but also stresses the mycelium. Success rate is modest.
- Spreading contamination: The tub is compromised. Remove it from your grow space, seal it in a trash bag before opening, and dispose of. Do not try to harvest from a contaminated tub — the mold produces mycotoxins.
Prevention is the correct approach: sufficient spawn ratio, proper field capacity, and clean technique during the mix step.
Step 4: Initiate Fruiting
Trigger Conditions
Once the substrate is fully colonized (no brown CVG visible through the sides), wait an additional 3–5 days for the consolidation period. Then introduce fruiting conditions:
- Open the tub and fan the surface vigorously with the lid for 30–60 seconds. This drops CO₂ levels sharply, which is a primary fruiting trigger.
- Optionally, mist the surface lightly with a clean spray bottle of water. The surface should glisten but not pool water.
- Replace the lid.
- Move the tub to its fruiting location.
Fruiting Conditions
- Temperature: 72–78°F (22–26°C) — slightly cooler than colonization, which can also trigger pinning
- Humidity: 85–95% RH maintained inside the tub; the sealed tub and moisture in the CVG create a self-humidifying environment
- Fresh air exchange (FAE): Open the tub and fan twice daily — once in the morning, once in the evening. This is the most critical maintenance task. CO₂ build-up above the substrate inhibits pinning and produces weak, leggy mushrooms.
- Light: 12 hours indirect light daily. Light provides directional cues for pin orientation; mushrooms grow toward light. A window across the room or an overhead light on a timer works fine.
Pinning
Pins appear on the substrate surface within 5–14 days of initiating fruiting conditions. They begin as small white bumps, develop into recognizable pin structures, and then grow rapidly to harvest size.
Pinning problems:
- No pins after 14 days: Insufficient FAE (most common cause), substrate too dry, or temperature too low. Fan more aggressively; re-mist lightly; verify temperature.
- Pins forming on sides of tub rather than top: Normal — side pins form where light penetrates the tub sides. You can harvest side pins by carefully moving the substrate mass away from the tub wall with a clean fork.
- Pins aborting (turning brown and dying): Usually humidity too low, or FAE disturbing humidity too aggressively. Reduce fanning duration; mist more gently.
Step 5: Harvest
Timing
Harvest when the veil is about to break or just beginning to tear — before spores are released. At this stage psilocybin concentration is at its peak. Waiting until after spore release is suboptimal for potency and creates a mess (spores turn everything dark purple-black).
Harvesting a monotub: the entire flush typically ripens within a 24–48 hour window once the first mushrooms reach maturity. Harvest everything in the tub at once when the most advanced mushrooms show veil tearing — don't leave some while harvesting others.
Harvest Technique
- Wear clean gloves.
- Twist and pull each mushroom near the base to remove cleanly. They should detach without tearing the substrate significantly.
- After clearing all mushrooms, remove any pins that aborted or any remaining stubs — these will rot and contaminate the substrate surface.
- Scrape and remove any obvious dead material from the substrate surface with a clean spoon.
Yields
A healthy 112qt monotub first flush from a good cubensis strain typically produces:
- Fresh weight: 150–400g
- Dried weight: 15–40g (approximately 10:1 fresh-to-dry ratio)
Second flushes are typically 50–70% of first flush yield. Third flushes are smaller. A substrate is exhausted after 3–5 flushes or when it no longer pins within 10–14 days after re-wetting, or when contamination appears.
Step 6: Between Flushes
After harvesting, the substrate needs re-hydration to support subsequent flushes.
Field Capacity Restoration
The substrate loses significant moisture during colonization and fruiting. Re-wet it using one of two methods:
Method 1 — Pooling: Pour 500–800ml of clean room-temperature water over the substrate surface. Allow it to absorb for 30–60 minutes, then drain excess water by tilting the tub. The substrate should feel saturated but not sitting in standing water.
Method 2 — Cold shocking: Some growers refrigerate the tub for 24–48 hours between flushes (35–45°F). The temperature drop combined with re-wetting can improve pin set density on subsequent flushes, particularly for strains that are reluctant to pin on later flushes.
After re-wetting, resume fruiting conditions — fanning twice daily and 12 hours of light. Expect the next flush within 7–14 days.
Troubleshooting
| Problem | Likely Cause | Solution | |---------|-------------|----------| | Slow colonization (25+ days) | Low temperature, low spawn ratio | Verify temp 75–81°F; increase spawn ratio next grow | | Trichoderma (green mold) | Contaminated spawn, poor technique, over-wet substrate | Check spawn quality; improve technique; verify field capacity | | No pinning after 14 days | Insufficient FAE, too dry, too cool | Fan more aggressively; re-mist; check temperature | | Leggy, long-stemmed mushrooms | Excess CO₂, insufficient FAE | Increase fanning frequency; check polyfill holes aren't blocked | | Pinning on sides only | Normal side-pinning; insufficient top-surface FAE | Continue; harvest side pins; ensure top surface gets air | | Flushes stop after 1–2 | Substrate too dry between flushes | Use pooling method; ensure adequate re-wetting | | Slimy substrate surface | Bacterial contamination, over-wet | Surface contamination: scrape and remove affected area; if pervasive, dispose of tub |
From Monotub to Next Level
Once you're running monotubs reliably, the natural progressions are:
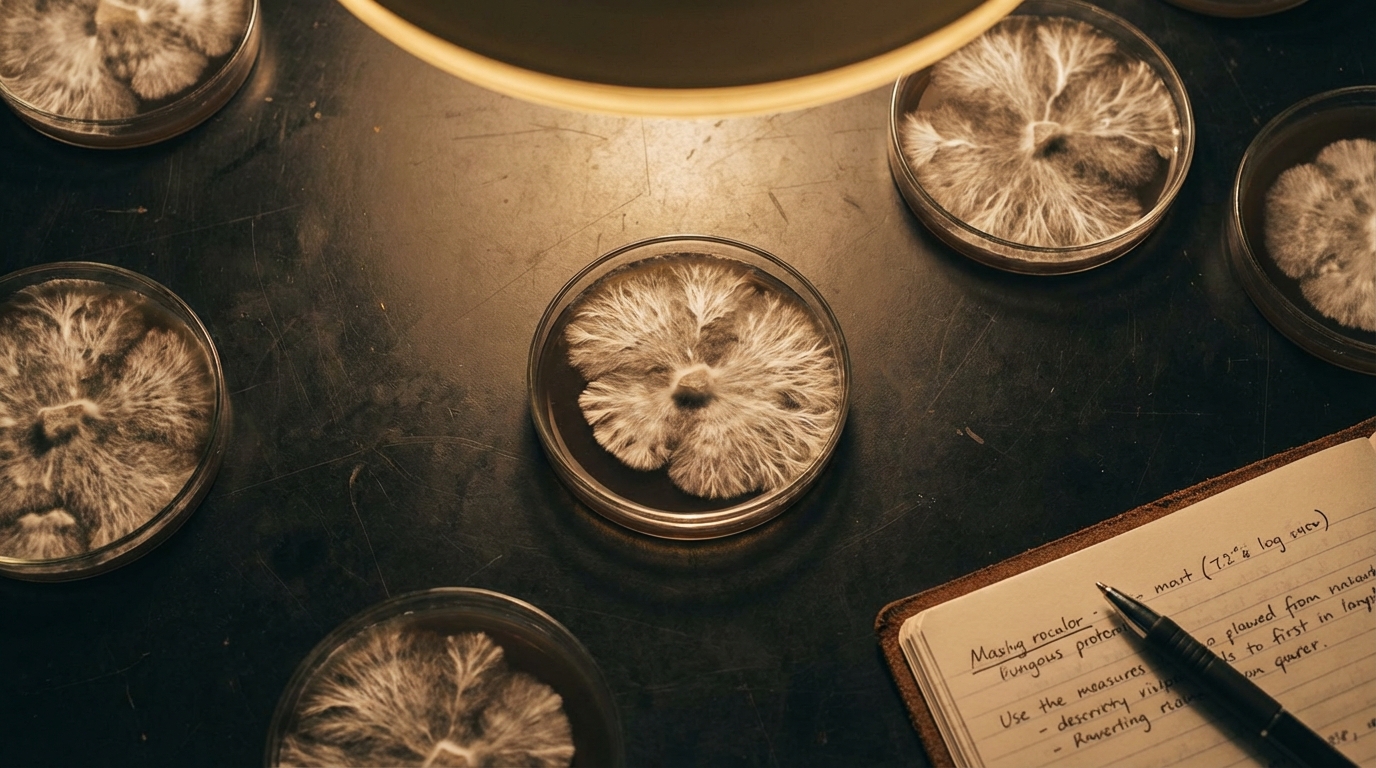
- Agar work — isolate a high-performing culture from your best fruiting body; eliminate genetic variation and contamination from your lineage. See Agar Work.
- Multiple tub rotation — stagger inoculation dates to maintain continuous harvest cycles rather than single-batch grows.
- Substrate optimization — experiment with manure-based substrates, straw blends, and specialty mixes for specific strains. See Substrate Guide.
- Grain-to-grain transfer — instead of inoculating grain from spore syringes each time, transfer mycelium from colonized grain to fresh sterile grain, multiplying your spawn without additional syringe use.
Common Problems & Troubleshooting
See the Contamination Guide for common issues.
Tips for Success
Take notes at every stage. Consistency beats perfection.