Fruiting Chamber Setup Guide
Everything you need to know about Fruiting Chamber Setup Guide — from materials to first harvest.

What You'll Need
- See full supply list in guide below.
Find grow supplies at vendors in our Directory.
Step-by-Step Process
Fruiting Chamber Setup Guide: From SGFC to Martha Tent
A fruiting chamber is the environment where your colonized substrate produces mushrooms. The right chamber creates the conditions mushrooms need: high humidity (80–95% RH), fresh air exchange (FAE), and adequate light. This guide covers the spectrum from a basic shotgun fruiting chamber (SGFC) to intermediate Martha tent setups, with setup instructions for each.
What Mushrooms Need to Fruit
Understanding the requirements makes everything else logical:
Relative humidity (RH): 80–95% Mushrooms are mostly water. If the surface of the substrate dries out, pinning stops and pins abort. You want the air humid enough that moisture stays on the surface without soaking the substrate.
Fresh air exchange (FAE): Low CO₂ Mushrooms produce CO₂ during respiration. In a sealed container, CO₂ accumulates and inhibits pinning — mushrooms try to grow taller stems to reach fresh air. FAE keeps CO₂ low, promotes dense caps, and prevents leggy, stemmy growth.
Light: Low level, indirect Mushrooms don't photosynthesize, so light isn't for energy. However, indirect light signals "up" to the mycelium — mushrooms orient toward light. 12 hours of indirect light per day is standard. Direct sunlight can dry surfaces and raise temperature.
Temperature: 70–78°F for most cubensis Slightly cooler than colonization temperature for most strains. Exact optimum varies by strain.
Option 1: Shotgun Fruiting Chamber (SGFC)
Best for: Beginners, small grows, 1–4 cakes from PF Tek
The SGFC is a clear plastic storage bin (Sterilite or similar) with 1/4" holes drilled every 2 inches on all 4 sides, top, and bottom. Perlite soaked in water sits at the bottom as a humidity reservoir.
What you need:
- Clear plastic storage bin (6-quart, 12-quart, or larger)
- Perlite (horticultural grade, coarse)
- 1/4" drill bit and drill
- Spray bottle
Setup:
- Drill holes every 2 inches in a grid pattern on all 6 surfaces (4 sides, top, bottom)
- Add 4–5 inches of soaked perlite to the bottom (soak in water, then drain until no dripping)
- Place colonized cakes or a bulk sub directly on the perlite surface or on a piece of wire mesh over perlite
- Mist the walls (not the substrate directly) 2–4 times per day — more in dry climates
- Fan with the lid briefly after misting to introduce fresh air
Why it works: The holes provide passive FAE — air naturally circulates through the holes. The wet perlite provides humidity reservoir. Misting replenishes both.
Limitations: Requires active misting (no automation). Works well for small grows; scales poorly beyond 4–6 cakes or a small bulk sub.
Option 2: Martha Tent Setup
Best for: Intermediate to advanced growers, multiple bags or trays, hands-off operation
A Martha tent (small greenhouse tent with wire shelving) combined with an ultrasonic humidifier, fan, and controller creates a semi-automated fruiting chamber.
What you need:
- Mini greenhouse tent (2ft × 2ft × 4ft or similar — Amazon/eBay)
- Ultrasonic humidifier with external reservoir
- Small USB fan or computer fan
- Humidity controller (Inkbird IHC200 or similar — plugs humidifier in when RH drops below setpoint)
- Hygrometer/thermometer to verify conditions
- Wire shelving unit or wire racks to fill the tent
Setup:
- Assemble the wire shelving unit inside the tent
- Run the ultrasonic humidifier output tube into the tent (some setups run it through the zipper gap, some through a hole)
- Connect humidifier to the humidity controller
- Set the controller to turn on the humidifier at 85% RH and off at 95% RH
- Place a small fan inside the tent set to low, aimed at a wall (not directly at substrate) for continuous gentle FAE
- Add temperature/humidity sensor inside the tent and verify readings
Calibration:
- With this setup running, open tent twice daily to check and allow additional FAE exchange
- Some growers add a second fan on a timer that runs for 5 minutes every 2–4 hours for more active FAE
- If condensation is dripping from the top of the tent onto substrate, reduce humidifier run time
Advantages: Scales to dozens of bags or trays. Maintains humidity without manual misting. Can run unattended for a full day. More consistent conditions = more consistent flushes.
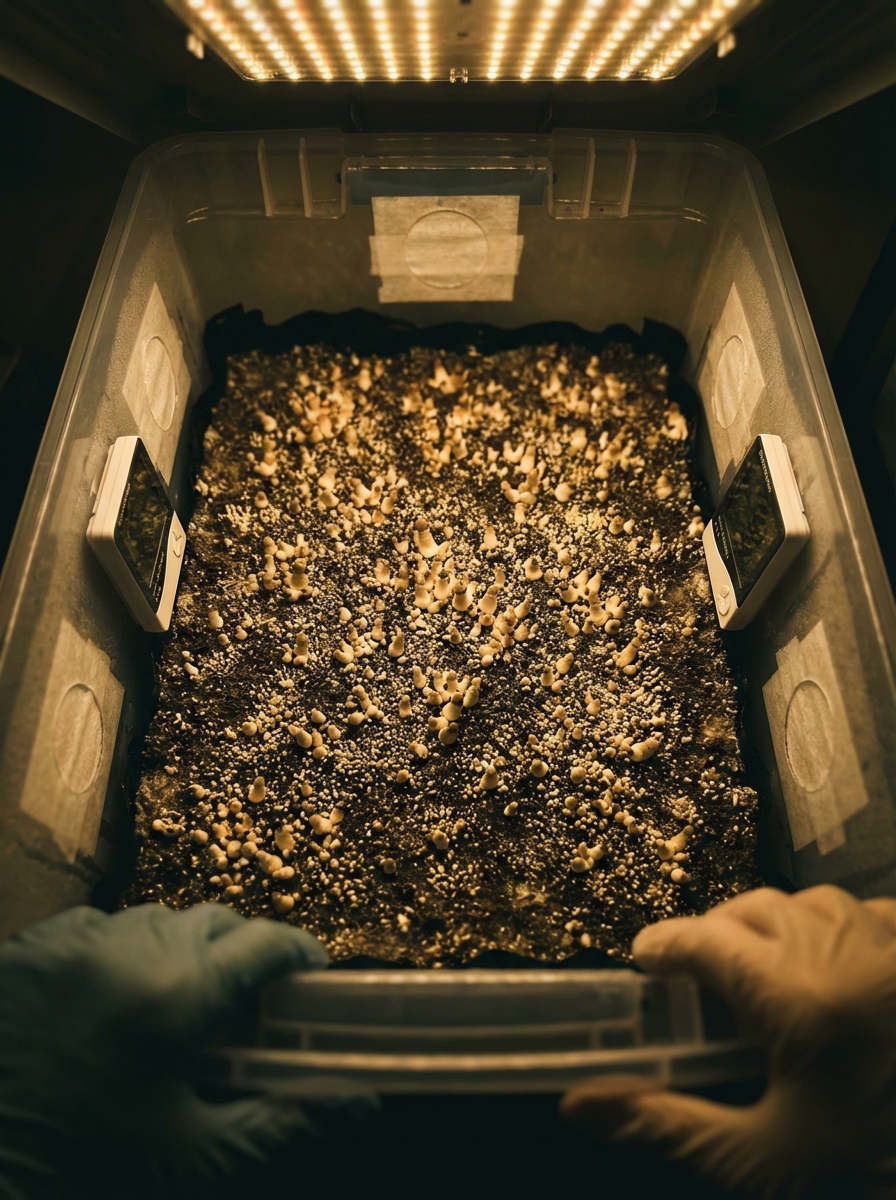
Option 3: Tub Fruiting (for Bulk Substrates)
For monotub-style setups, the tub itself is the fruiting chamber. The lid stays loosely in place or is modified with polyfill filter patches.
Standard monotub FAE setup:
- 4 holes (~2 inches diameter) drilled at the top of the long sides of the tub
- Polyfill (fiberfill from craft stores) stuffed into holes — allows air exchange while filtering contaminants
- Substrate fills the bottom portion; the air gap above is the fruiting space
Misting in tubs: Mist the walls of the tub (not the substrate directly) when you see the substrate surface lighten in color (drying). In a sealed tub with polyfill holes, this may only be needed every 1–3 days depending on ambient humidity.
When to "crack" the lid: Some growers use a fully sealed tub with no holes and crack the lid briefly twice daily instead of drilling holes. This works but requires more active attention.
Humidity and FAE: The Balance Problem
The challenge of fruiting chamber design is balancing humidity and FAE — they pull in opposite directions. High humidity wants a sealed environment; adequate FAE requires air exchange that also dries things out.
The signs of imbalance:
Too much CO₂ / insufficient FAE:
- Long, leggy, pencil-thin stems
- Small, poorly developed caps
- Aborts before caps develop
Too little humidity:
- Substrate surface dries and cracks
- Pins abort after forming
- Veils don't form properly
Too much moisture (wet rot / bacterial blotch):
- Wet, slimy, brown patches on substrate
- Foul smell
- Usually comes from direct misting onto substrate surface or condensation dripping from above
Fruiting Variables to Tune
Cold shocking: Placing fully colonized substrate in the refrigerator for 12–24 hours before fruiting can trigger a flush. Not always necessary with well-prepared substrate, but useful for stubborn non-pinning.
Light exposure: Some growers see improved pinning with more light (12–16 hours indirect). Direct sunlight is not beneficial; indirect natural light or a 6500K grow light on a timer works well.
Second and subsequent flushes: After harvesting, submerge the substrate in cold water for 12–24 hours ("dunking and rolling" for cakes; just soaking for bulk substrate). This rehydrates the substrate for the next flush. Each successive flush produces slightly fewer mushrooms, but multiple flushes are normal and expected. Most bulk substrates produce 3–5 good flushes.
Troubleshooting Fruiting Problems
No pins after 2 weeks in fruiting conditions:
- Substrate colonization may not be complete — check for white throughout
- Temperature may be too cold or too warm — check actual chamber temp
- CO₂ too high — increase FAE
- Try a cold shock
Pins forming then aborting:
- Humidity dropping too low — increase misting frequency or add more perlite
- Condensation dripping onto substrate from above — reduce humidifier
- Temperature fluctuation — try to stabilize
Green mold (trichoderma) appearing:
- Contamination — isolate the affected substrate from others
- Small spots: some growers salt the area and monitor; aggressive spread means disposal
- If substrate is not yet fruiting and has significant trichoderma, consider disposal rather than risking contaminating other grows
Summary: Choosing the Right Chamber
| Setup | Best For | Cost | Automation | |---|---|---|---| | SGFC | 1–4 cakes, beginners | $10–25 | None — manual misting | | Martha Tent | Multiple bags/trays | $80–150 | Partial — humidity automated | | Modified Monotub | Bulk substrate | $20–40/tub | Passive FAE | | Professional SAB + Flow Hood | Lab-scale | $200–2000+ | Full |
Start with what matches your current scale. The SGFC has produced more successful harvests than any other chamber type precisely because it works and scales to the grower's needs.
Common Problems & Troubleshooting
See the Contamination Guide for common issues.
Tips for Success
Take notes at every stage. Consistency beats perfection.